Today we’ll be talking about machine embroidery stabilizers! What the heck are they, and why do you need them!? If you’re a beginner to machine embroidery and you’re feeling a bit lost – fear not crafter! In our machine embroidery stabilizer guide you’ll learn everything you need to know to start stitching out machine embroidery designs like a pro.
What is a stabilizer in machine embroidery?
Embroidery stabilizer serves as a foundation, preventing distortion, puckering, or stretching that may occur as a result of the machine’s intricate movements. By providing stability to the fabric, these materials enable the machine to create precise and intricate designs, allowing embroiderers to achieve professional and polished results.
A well-chosen stabilizer is the unsung hero behind the scenes, contributing to the success and quality of every machine embroidery project. However, there are several different types of machine embroidery stabilizers to be aware of.
Types of Machine Embroidery Stabilizers
Tear Away Stabilizers
Tear-away stabilizers are a versatile and user-friendly. These stabilizers are designed to be easily torn or removed after the stitching process, leaving behind a smooth finish. Ideal for lightweight to medium-weight fabrics, tear-away stabilizers provide temporary support during stitching, particularly suited for projects where the stabilizer remnants won’t be visible.
Tear-away stabilizers are excellent for designs on fabrics like cotton, linen, or lightweight blends, where the stabilizer’s presence is minimal after removal. They’re also perfect for intricate or delicate embroidery, as the stabilizer offers enough support during stitching without altering the fabric’s drape.
Pros:
- Easy Removal: The tear-away feature simplifies the cleanup process, leaving little to no residue on the fabric.
- Versatility: Suitable for a wide range of projects, especially those where the stabilizer remnants won’t affect the final appearance.
- Quick Stitching: Tear-away stabilizers facilitate faster stitching, making them convenient for projects with tight deadlines.
Cons:
- Limited Stability: While tear-away stabilizers are effective for lightweight fabrics, they may not provide sufficient support for heavy or dense designs.
- Not Suitable for Freestanding Designs: In projects requiring stability beyond the stitching, such as freestanding lace, tear-away stabilizers might not be the optimal choice.
Cut Away Stabilizers
Unlike tear-away stabilizers, cut-away varieties remain in place after stitching, offering long-term stability and preventing distortion in heavier or stretchy fabrics. This is obviously not ideal for projects where you can see the stabilizer, but it can be great for projects that need additional support where the stabilizer will be hidden.
Cut-away stabilizers are indispensable for heavyweight fabrics, knits, or materials prone to stretching, providing continuous support even after the embroidery process.
Pros:
- Permanent Support: Cut-away stabilizers remain attached to the fabric, providing ongoing stability and preventing distortion, making them suitable for durable items like garments.
- Superior for Stretchy Fabrics: When working with stretchy materials, cut-away stabilizers excel in maintaining the fabric’s shape and preventing sagging or puckering.
- Suitable for High-Density Designs: Perfect for projects with intricate details or high stitch density, as cut-away stabilizers offer robust and lasting support.
Cons:
- Residual Material: The stabilizer remains on the fabric after the embroidery is complete, necessitating trimming close to the design to minimize visibility.
- Not Suitable for Freestanding Designs: Cut-away stabilizers are not recommended for projects requiring the stabilizer to be entirely removed, such as freestanding lace.
Water- Soluble Stabilizers
Water-soluble stabilizers offer a unique solution in machine embroidery, providing temporary support that dissolves completely in water, leaving behind a clean and unaltered design. These stabilizers are especially useful for projects where no residual stabilizer is desired or for creating delicate freestanding lace designs.
Water-soluble stabilizers are indispensable for freestanding lace projects, where the stabilizer is entirely dissolved, leaving only the embroidered design. This stabilizer is also an excellent choice for projects which use sheer materials, as the stabilizer provides temporary support without affecting the fabric’s transparency.
Pros:
- Clean Removal: The stabilizer dissolves entirely in water, leaving no traces behind and ensuring a pristine final result.
- Versatility: Ideal for projects where visibility of the stabilizer is undesirable, such as lace or sheer fabrics.
- Supports Delicate Designs: Suited for intricate and delicate designs where a temporary stabilizing layer is needed during embroidery.
Cons:
- Limited Support for Heavy Designs: Not suitable for heavyweight or dense embroidery projects, as water-soluble stabilizers may not provide adequate stability in the long-term.
- Requires Water for Removal: The removal process involves immersing the embroidered item in water, which may not be suitable for all fabrics or projects.
Heat-Away Stabilizers
Heat-away stabilizers provide a convenient and residue-free solution for machine embroidery projects, designed to vanish with the application of heat. These stabilizers are particularly useful for projects where complete removal is desired without the need for water or manual tearing.
Heat-away stabilizer could be a good choice if you can’t use a water-soluble stabilizer, but you don’t want to leave any stabilizer or residue behind on your finished machine embroidery project.
Pros:
- Heat-away stabilizers vanish completely with the application of heat, leaving behind a clean and unaltered embroidered design.
- Perfect for fabrics that cannot be exposed to water, ensuring the integrity of delicate or sensitive materials.
Cons:
- Limited Support for Heavy Designs: Similar to water-soluble stabilizers, heat-away stabilizers may not provide sufficient support for heavyweight or dense embroidery projects.
- Requires Heat Source: The removal process involves using a heat source, such as an iron, which may not be suitable for all fabrics or projects.
Machine Embroidery Stabilizer Weights
On top of there being several different varieties of stabilizer, these stabilizers also come in different weights! Choosing the correct stabilizer weight depends on the fabric you’ll be stitching out a design on. Heavier fabrics generally need heavier weight stabilizers.
Lightweight Stabilizers
Lightweight stabilizers offer support without adding bulk or stiffness to the fabric. They are perfect for intricate or detailed designs on softer materials. Ideal for delicate and lightweight fabrics such as chiffon, organza, and lightweight cotton. Suitable for designs with low to medium stitch density.
Medium Weight Stabilizers
Medium weight stabilizers provide a balance between support and flexibility. They work well for everyday projects and offer stability without overly affecting the fabric’s drape. Versatile and suitable for a wide range of fabrics, including cotton, polyester, and blends. Effective for designs with moderate stitch density.
Heavyweight Stabilizers
Heavyweight stabilizers offer robust support, preventing distortion in fabrics that may be prone to stretching or sagging. Suitable for heavyweight fabrics like denim, canvas, or materials with a significant stretch. Ideal for designs with high stitch density or large embroidery areas that need additional support.
How to Choose the Right Stabilizer For Your Machine Embroidery Project
Below you’ll find a short list of some common machine embroidery projects and the recommended stabilizer for each one. BUT, it’s important to keep in mind that if you’re using certain fabrics adjustments may need to be made. Especially for stretch, knit, or delicate fabrics.
| Machine Embroidery Project | Recommended Stabilizer | Additional Notes |
|---|---|---|
| T-Shirts and Apparel | Cut-away stabilizer (lightweight for soft garments, medium to heavy for structure) | Consider the fabric’s stretch and choose the appropriate weight. |
| Towels and Linens | Tear-away stabilizer (lighter fabrics) or Cut-away stabilizer (heavier towels) | Use tear-away with good stability for intricate designs on delicate linens. |
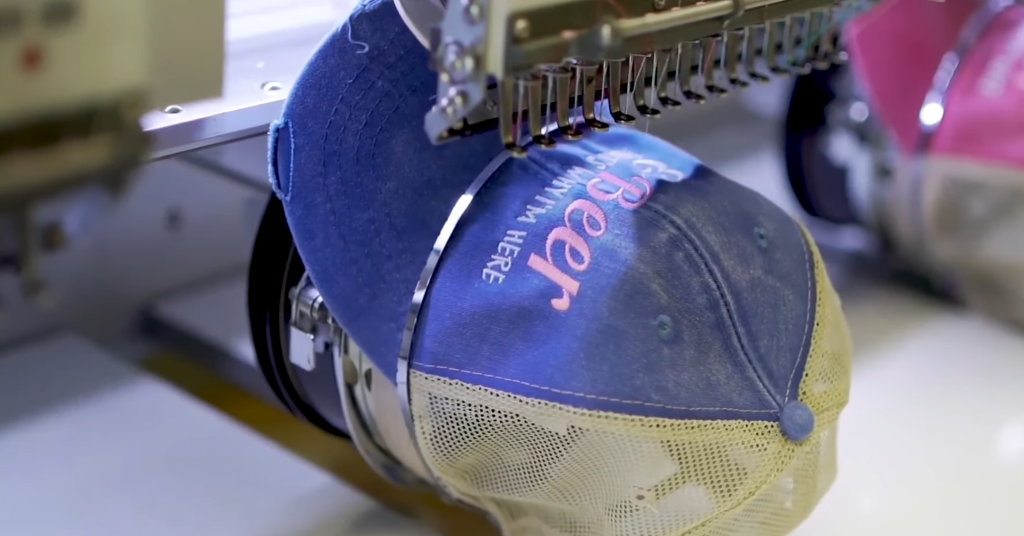
| Caps and Hats | Firm, cut-away stabilizer designed for caps | Ensure the stabilizer provides support for dense designs on the curved surface. |
| Quilts and Blankets | Cut-away stabilizer for quilt blocks, Water-soluble stabilizer for freestanding blocks | Water-soluble stabilizer is ideal for freestanding embroidered quilt blocks. |
| Children’s Clothing | Tear-away stabilizer for lightweight fabrics | Choose a soft and flexible stabilizer to maintain comfort. |
| Denim Jackets and Jeans | Cut-away stabilizer (medium to heavy) | Use a medium to heavy cut-away stabilizer for intricate designs on denim. |
| Canvas Bags and Totes | Medium to heavy cut-away stabilizer or Tear-away stabilizer | Consider tear-away if the back of the design will be concealed or if the fabric is lightweight. |
| Polo Shirts and Golf Shirts | Cut-away stabilizer (lightweight for soft fabrics, medium for structure) | Choose a cut-away stabilizer based on fabric type and desired structure. |
| Pillowcases and Cushion Covers | Tear-away stabilizer for lightweight fabrics, additional cut-away for dense designs | Add a layer of cut-away for extra support in intricate or dense designs. |
| Leather Accessories | Cut-away stabilizer (lightweight for soft leather, medium to heavy for structure) | Select a cut-away stabilizer suitable for the specific type and thickness of the leather. |
Combining More Than One Stabilizer
Some machine embroidery projects may actually require more than one stabilizer! For example, if you’re working with towel machine embroidery designs, you’ll want to use tear away for the back and a water-soluble stabilizer for the top! Sometimes, using more than one stabilizer can help you achieve a better finished product.
| Use Case | Stabilizer Combination | Additional Notes |
|---|---|---|
| Complex Designs on Lightweight Fabric | Tear-away + Water-Soluble | Water-soluble stabilizer adds stability without bulk on lightweight fabrics with intricate or dense designs. |
| Freestanding Embroidery on Quilts | Cut-away + Water-Soluble | Water-soluble stabilizer for freestanding designs combined with cut-away for base stability on quilt blocks. |
| Embroidery on Stretchy Knits | Lightweight Cut-Away + Water-Soluble | The combination accommodates the stretch of knits and provides stability during stitching. |
| Delicate Fabrics with Heavy Designs | Tear-away + Water-Soluble | Tear-away offers initial support, and water-soluble stabilizer adds stability for heavy or dense designs on delicate fabrics. |
| Caps with Dense Designs | Firm Cut-Away for Caps + Water-Soluble | A combination designed for caps, providing firm support and handling intricate details with water-soluble stabilizer. |
| Embroidery on Leather | Cut-away (specific to leather) + Tear-away | Tailor stabilizer choice to leather type and thickness, using both for additional support in intricate designs. |
| Embroidery on Towels | Tear-away Backer + Water-Soluble Topper | The backer offer stability, and the topper keeps the design from sinking down into the towel. |
| Embroidering on Caps with Mesh Backing | Cut-away for Caps + Tear-away for Mesh | Reinforces the mesh area of caps with a combination that offers stability and support. |
How to Use Stabilizer for Embroidery
Hooping the Stabilizer and Fabric Together:
- Selecting the Right Hoop Size:
- Choose an embroidery hoop that accommodates the size of your design without distorting the fabric or the stabilizer.
- Ensure that the hoop is clean and free from any residue that could transfer onto your fabric.
- Placing the Stabilizer:
- Lay the selected stabilizer over the bottom hoop, making sure it covers the entire area where the embroidery will be stitched.
- Smooth out the stabilizer to eliminate any wrinkles or folds that could affect the embroidery process.
- Positioning the Fabric:
- Carefully lay your fabric over the stabilizer, aligning it with the hoop.
- Smooth out the fabric to remove any wrinkles, ensuring it is taut but not overly stretched.
- Securing the Hoop:
- Place the top hoop over the fabric and stabilizer, gently pressing down to secure it.
- Tighten the hoop’s screw to ensure a snug fit without distorting the fabric.
Stabilizer Positioning:
- Considering the Design:
- Take note of your embroidery design and identify areas with dense stitching or high stitch counts.
- Adjust the placement of the stabilizer to provide extra support in these areas, preventing distortion.
- Aligning the Fabric and Stabilizer:
- Ensure that the fabric and stabilizer are well-aligned within the hoop.
- Pay attention to the grain of the fabric and orient it properly to prevent misalignment issues during embroidery.
- Securing the Layers:
- Use temporary adhesive sprays or tapes if needed to secure the fabric and stabilizer layers in place.
- Avoid overusing adhesives to prevent residue buildup on the needle and machine components.
- Double-Checking Tautness:
- Confirm that the fabric and stabilizer are still taut within the hoop before placing it in the embroidery machine.
- Adjust tension as necessary to maintain stability during the stitching process.
Properly hooping the stabilizer and fabric lays the foundation for successful machine embroidery. Taking the time to position and secure these layers accurately ensures that your final results are free from distortion and puckering problems that could ruin your final project.
Machine Embroidery Stabilizer Tips and Tricks
Hoop the Stabilizer with the Fabric
Hoop both the stabilizer and fabric together to ensure they move in sync during embroidery, preventing misalignment.
Use Tear-Away stabilizer For Delicate Fabrics
Tear-away stabilizers work well for lightweight or delicate fabrics, preventing damage during removal.
Test on Scrap Fabric
Before starting a project, test the chosen stabilizer on scrap fabric to ensure it provides the right amount of support without being too visible. (This is honestly good advice for testing new embroidery designs you get too!)
Secure Edges with Spray Adhesive
For challenging fabrics or intricate designs, lightly spray the stabilizer with temporary adhesive before hooping to secure the fabric’s edges.
Document Settings for Reference
Keep a record of successful stabilizer and machine settings for specific fabrics and projects for future reference. You can keep a notepad next to your craft area or just create a text document or spreadsheet on your computer.
Common Machine Embroidery Stabilizer Problems & Solutions
Puckering and Distortion
If your design appears to be puckered or distorted after stitching, you may be using the wrong stabilizer. Make sure you’re using the correct type and weight of stabilizer to properly support the fabric! You should also make sure you’ve hooped both the fabric and stabilizer securely to prevent movement. You should also check that your tension is set properly or it could pull on the stabilizer, causing distorted results.
Difficulty Removing Tear-Away Stabilizers
If you’re having trouble getting your tear-away stabilizer to come away clean you can try to lightly moisten it with a damp cloth, or carefully trim away the stubborn bits.
Stabilizer Does Not Provide Enough Support
You may need to choose a heavier weight stabilizer. However, you can even double up on stabilizer layers for particularly large or dense machine embroidery design. Switching to a cut-away stabilizer can also give lasting support to such embroidery designs, but the stabilizer will be visible from the back of the project.
Stabilizer Adhesive is Damaging Delicate Fabrics
Delicate fabrics, especially sheer are tricky. Try switching to an opaque mesh water soluble stabilizer, such as this one from Aquamesh. This stabilizer will wash away without a trace of residue.
Sunken Stitches
If you’re trying to stitch out something like a towel embroidery design on a high-pile fabric, you may need to include a water-soluble topper! This can help prevent stitches from sinking into the fabric and produce a more attractive final result. (Please see the ‘combining stabilizers’ section above.)
In short, choosing the correct stabilizer for your project is the key to success in many machine embroidery projects! Learning when and where to use each type of stabilizer can save you a lot of frustration. But, don’t hesitate to experiment with different stabilizers and techniques to find what works best for your unique projects. Happy crafting!

Barb, our resident quilter and embroidery aficionado, weaves a thread of creativity through our collection. Serving as the curator of machine embroidery content, Barb infuses each design with a touch of her artistic expertise. The free embroidery patterns you discover on our site often bear the mark of Barb’s craftsmanship. Let’s get crafting!